A laser-cut relief map of K2, with its climbing routes
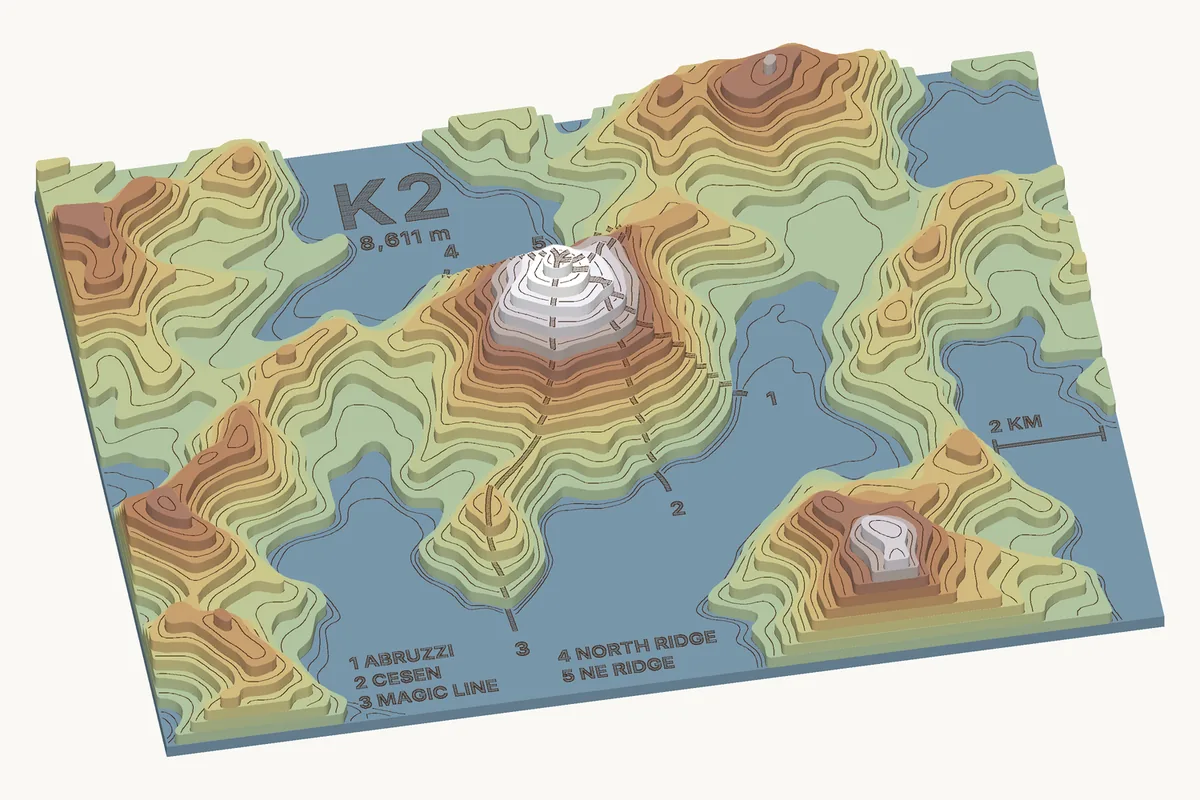
A layered relief map is a mountain you can hold: the terrain cut into stacked sheets, one per height step. The part that makes one worth giving away is what is engraved on it, the name and the lines people have climbed. This post builds one for K2, the second-highest mountain on Earth, from scratch: where to get a free heightmap, how to draw an SVG of routes and lettering that lines up with that heightmap exactly, and how to set up the relief map generator so the lettering lands on flat ground. The same steps work for any mountain.
What comes out is a 200 × 150 mm map made of 13 sheets of 3 mm plywood (39 mm tall), close to true scale: 1:90,000 across, and the relief stretched only 1.06 times. Two 600 × 400 mm sheets of material hold all the parts, and the cutting takes 8.3 m of line.
What you need
- The Relief map generator. It is a Pro generator and runs in your browser, so the files you load are not uploaded anywhere (pricing).
- To make the two input files, either the two short Python scripts below (Python 3 with
rasterio,numpy,Pillowandfonttools) or, if you prefer a mouse, QGIS and Inkscape. Both ways are described. - A laser cutter, 3 mm plywood (two 600 × 400 mm sheets), a 3 mm bamboo skewer for the alignment pins, wood glue, and paint or stain if you want the classic contour-map colours.
K2 and the routes on this map
K2 (Chogori) is 8,611 m high, in the Karakoram on the border of Pakistan and China. It was first climbed on 31 July 1954 by Lino Lacedelli and Achille Compagnoni of an Italian expedition led by Ardito Desio. Its ridges and pillars have attracted climbers ever since, and the lines they tried make a good set of markings, since each is a distinct path up the same mountain. Five go on this map:
| # | Route | Side | First climbed | Notes |
|---|---|---|---|---|
| 1 | Abruzzi Spur (south-east ridge) | Pakistan | 31 July 1954, Lacedelli and Compagnoni | The standard route: most summits are made by it, including the first winter ascent on 16 January 2021 by ten Nepali climbers. |
| 2 | Česen route (south-south-east spur) | Pakistan | 1994, a Basque team | Tried by a French-German team in 1981 and an American team in 1983; Tomo Česen climbed it as far as the Shoulder in 1986. It joins the Abruzzi Spur there. |
| 3 | Magic Line (south-south-west pillar) | Pakistan | 3 August 1986, a Polish-Slovak team | Named by Reinhold Messner, who tried it in 1979. Wojciech Wróż, Przemysław Piasecki and Peter Božík reached the top; Wróż died on the descent. Renato Casarotto's solo attempts on it ended with his death in a fall in 1986. |
| 4 | North Ridge | China | 1982, a Japanese expedition | The first ascent from the Chinese side; seven climbers reached the summit without bottled oxygen. |
| 5 | Northeast Ridge | China | 6-7 September 1978, an American expedition led by Jim Whittaker | A new route and only the third ascent of K2: up the ridge from China, then across the east face to the Abruzzi Spur. |
Not on the map, but worth knowing: Jerzy Kukuczka and Tadeusz Piotrowski climbed the South Face, the "Polish Line", alpine style on 8 July 1986, and a Japanese team opened the Northwest Face in 1990. Where the sources disagree (the Česen dates, camp heights) the table keeps to what I could confirm. The sources are listed at the end.
A caution about the lines. The route lines on the finished map are schematic. I traced them from the ridge crests in the elevation data (the south-east ridge, the south-south-east spur and so on) and checked that they climb through the heights where guides place the camps: the Abruzzi line passes about 7,260 m and 6,735 m, against camps at roughly 7,200-7,400 m and 6,600-6,700 m. They are not GPS tracks: a real ascent zigzags around seracs, crosses faces off the crest (the Abruzzi Spur's famous Bottleneck traverse is one) and changes from year to year. It is a map of where the routes go, not a route guide. If you have a GPX track you are allowed to use, swap it in (step 3).
Step 1: Pick the frame
A relief map is a rectangle of ground. K2 stands at 35.8825° N, 76.5133° E, and this one is 18 km wide and 13.5 km tall, centred a little south of the summit at 35.875° N, 76.52° E. That gives:
- a 4:3 landscape shape, which suits a plaque;
- the glaciers around the mountain, which turn into the flat ground the lettering will sit on (their floors are at 4,800-5,500 m, while the summit is more than 3,000 m above);
- both sides of the mountain: the Pakistani approach on the south and the Chinese one on the north;
- room at the edges: Broad Peak (8,051 m) shows its top at the bottom edge, cut off by the frame.
Write down the centre and the size. You will give the same four numbers to both scripts, and that is what makes the markings line up.
Step 2: Get the heightmap
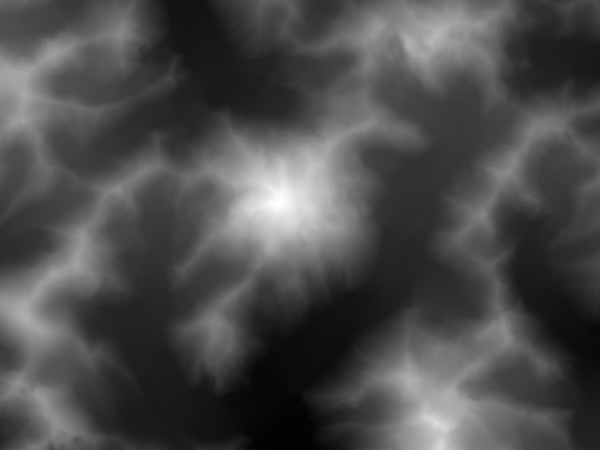
The generator reads a greyscale PNG: light is high, dark is low. For a real place you need elevation data, and there is a good free source: the Copernicus DEM GLO-30, a 30 m global elevation model (made from radar satellite data) that is public on the AWS Open Data registry. It comes as one GeoTIFF per degree of latitude and longitude, and each can be read straight off the web, so you do not download a thing you do not need.
Three details matter, and a GeoTIFF is not ready as it comes:
- Pixels must be square on the ground. The files are in latitude/longitude, where at K2's latitude a degree of longitude is only 81 % as long as a degree of latitude. Used as they are, the mountain would be stretched sideways by about 23 %. So the script reprojects the map to UTM (a flat map in metres) at the model's own 30 m pixel.
- Use 16 bits. An 8-bit PNG has 256 grey levels, which on 3,700 m of relief means 15 m terraces. The generator reads 16-bit PNGs.
- North is up. The generator takes the top of the image as north, and so does the script.
heightmap.py does it in a minute (or take the result of the command below,
k2-heightmap.png, and skip to step 3; mind the notice in the data credit at the end).
The core of the script:
# UTM zone, pixel-to-metre transform, size in pixels
crs, to_metres, (w, h) = frame(lat, lon, width_km, height_km)
out = np.zeros((h, w), "float32")
with rasterio.open(TILE.format(lat=int(lat), lon=int(lon))) as src:   # read over HTTPS
    win = from_bounds(lon - d, lat - d, lon + d, lat + d, src.transform)
    reproject(src.read(1, window=win), out,
              src_transform=src.window_transform(win), src_crs=src.crs,
              dst_transform=to_metres, dst_crs=crs,
              resampling=Resampling.bilinear)
# ...then scale lowest..highest to 0..65535 and save as a 16-bit PNG
pip install rasterio numpy pillow fonttools
python heightmap.py 35.875 76.52 18 13.5 k2.png
# 600 x 450 px, black = 4838 m, white = 8569 m
If you would rather click: open a DEM in QGIS, clip it to your area, and with GDAL (QGIS ships it) run the same two
steps, where xmin ymin xmax ymax are the rectangle's corners in the UTM zone's metres:
gdalwarp -t_srs EPSG:32643 -tr 30 30 -r bilinear \
    -te xmin ymin xmax ymax dem.tif k2_utm.tif
# -scale: your lowest and highest elevation, then 0 65535
gdal_translate -of PNG -ot UInt16 -scale 4838 8569 0 65535 k2_utm.tif k2.png
(EPSG:32643 is UTM zone 43 North, which covers 72-78° E. Other places have other zones.)
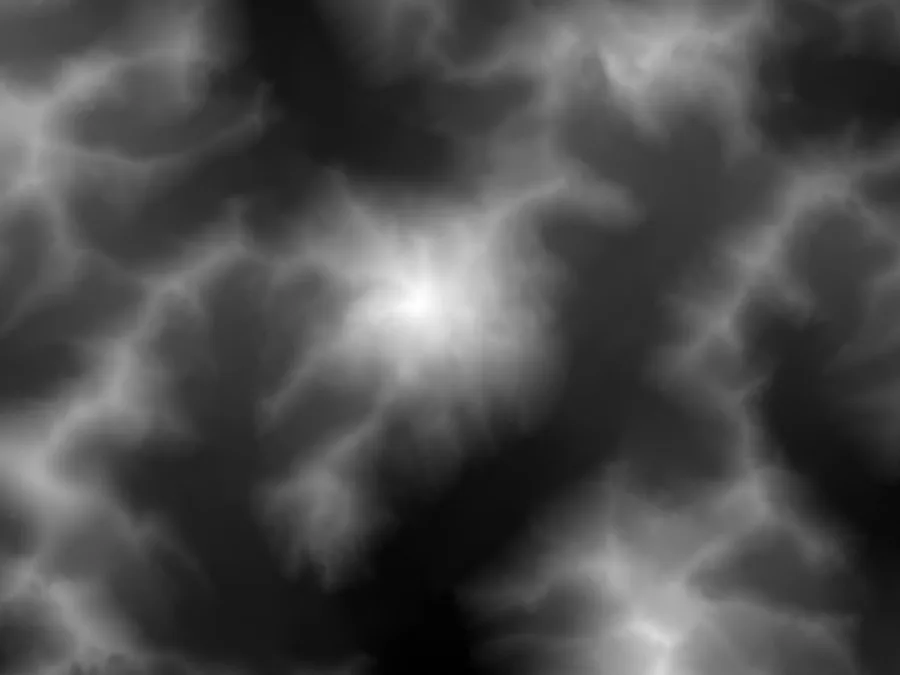
Check it. Three quick sanity checks before you go on:
- The script printed the heights black and white stand for. White is 8,569 m: 42 m under K2's published 8,611 m, which is normal for a 30 m grid on a sharp summit, and the highest pixel lies about 220 m from the published summit position. Good.
- The picture looks like terrain: white pyramid in the middle, smooth dark glaciers, no speckle or stripes.
- If the summit looks like a crater, the data has voids. My first try used the Terrarium web-map tiles, built from older radar data (SRTM) among other sources, and K2's top came out as a noisy bowl; steep ground is where older data has gaps. Copernicus gave a clean peak.
Step 3: Draw markings that match
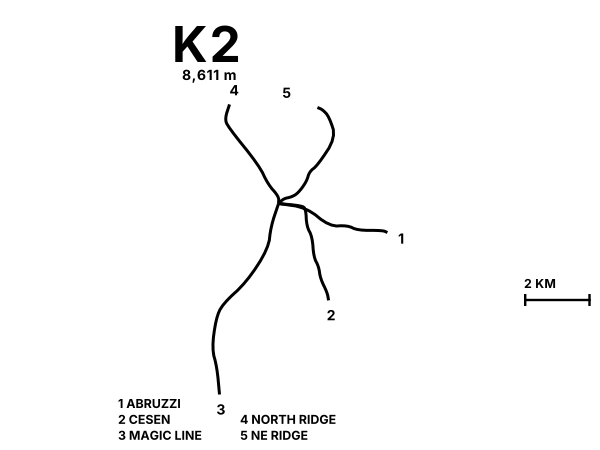
The generator can engrave a second file over the map: an SVG (or PNG) of names, roads, rivers, or here, routes. It takes the file as the same shape as the heightmap and stretches it over the whole map. So the rule is:
The SVG must have the same pixel size as the heightmap (here 600 × 450), and one SVG unit is one heightmap pixel.
If the two differ in shape by more than 3 %, the generator warns that the markings are stretched. Draw on top of the heightmap and everything lines up.
Option A: in Inkscape
- File > Document Properties: display units px, scale 1, custom size 600 × 450 px.
- Put the heightmap (or a hillshade of it) on its own layer at X 0, Y 0, and lock the layer. It is only a background to trace on.
- On a new layer, draw the routes with the pen tool, and place the lettering with the text tool.
- Convert text to paths (Path > Object to Path). The generator does not read
<text>; it warns and leaves it out. - A stroke is engraved as a single hairline, which gets lost among the contour lines. For a bold line, select it and use Path > Stroke to Path: a filled shape is engraved filled (outline plus fine hatching).
- Delete or hide the background and save as Plain SVG.
Option B: from coordinates, with a script
Because the heightmap came from a latitude/longitude and a size, anything with a latitude and longitude can be put
in the right pixel with the same code. markings.py takes the routes as lists of
waypoints and turns them, with the title, a legend and a scale bar, into one SVG. The parts that matter:
from heightmap import PIXEL, frame, to_xy      # the very same frame as the heightmap

crs, to_metres, (W, H) = frame(LAT, LON, WIDTH_KM, HEIGHT_KM)
MM = W / MAP_MM            # SVG units per millimetre of the finished map

def px(lat, lon):          # latitude/longitude -> pixel in k2.png
    x, y = to_xy(crs, lat, lon)
    return (x - to_metres.c) / PIXEL, (to_metres.f - y) / PIXEL

line = smooth([px(*p) for p in waypoints])      # a flowing line
shapes.append(polygon(ribbon(line, 1.0 * MM)))  # a 1 mm strip: a bold line
shapes.append(text("K2", 172, 62, 12))          # outlines, capitals 12 mm tall
python markings.py /path/to/Inter-Bold.otf k2-markings.svg # any TrueType or OpenType font
The waypoints are the ridge lines described above (about ten per route, at the head of the script). The file the
script wrote is k2-markings.svg, if you want to load it as it is.
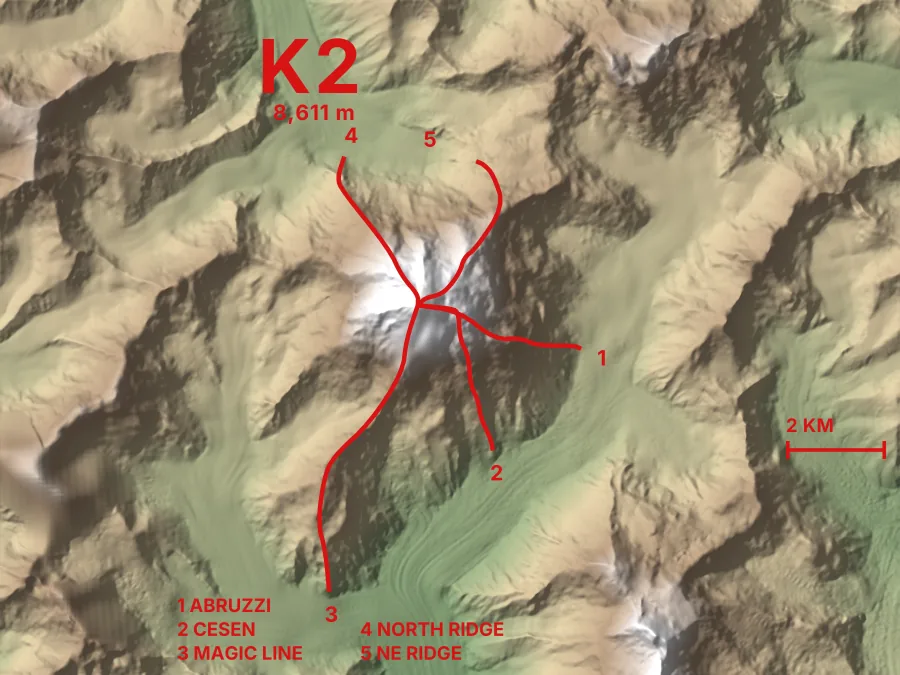
Where to put the lettering
Engraving is cut up wherever it crosses a step between layers, so text belongs on flat ground: here, the glacier floors that the generator turns into the bare base sheet. Two rules:
- Keep capitals at least 3 mm tall on the finished map. At 3 px to the millimetre that is 9 px. The title is 12 mm, the legend and numbers 3-3.4 mm.
- Keep text at least 1.5 mm away from the foot of the first slope. I found the free ground by running the generator once with no markings, looking at the flat blue base in the preview, and then checking by script that every letter lies inside it (the legend is in two columns because the glacier is wider than it is tall).
Route numbers sit just past the foot of each route, on the flat. The routes themselves cross the layers, and the generator splits them over every sheet they climb, stopping each line 0.2 mm short of each step so it still reads on a slope.
Step 4: Set up the relief map generator
Open the Relief map generator, load the two files (Heightmap or 3D model = k2.png, Markings
= k2-markings.svg) and set:
| Setting | Value | Why |
|---|---|---|
| Map size | 200 mm | The long side. The short side follows the heightmap (150 mm). 18 km across 200 mm is 1:90,000. |
| Relief height | 36 mm | From the flat ground to the summit, rounded to whole sheets: 12 sheets of 3 mm. It is 3,059 m of height, so about 1:85,000: the relief is stretched only 1.06 times. |
| Sea level | 18 % | Everything lower than 18 % of the height range (about 5,510 m) is flattened: the glaciers become the bare base sheet, where the lettering is. |
| Shape | rectangle | The whole image. |
| Base sheets | 1 | A solid sheet under the relief. |
| Smallest feature | 2 mm | The default: narrower bits of a layer are left out, because they break when cut. K2's top sheet is about 5 mm across and survives. |
| Smoothing | 1 mm | The default. |
| Contour lines per layer | 1 | The default: a line half way up each step, like a printed map. |
| Engrave next layer outline | on | Marks where each sheet goes, hidden once glued. |
| Alignment pins, Pin diameter | 2, 3 mm | Hidden pins in blind holes that line up the sheets (a 3 mm skewer). |
| Material thickness | what your calipers say | Measure your sheet: 3 mm plywood is often 2.8-3.2. The number of layers follows it. |
Under Material & machine, set the Kerf and sheet size for your machine; if you do not know your kerf, cut the fit test first.
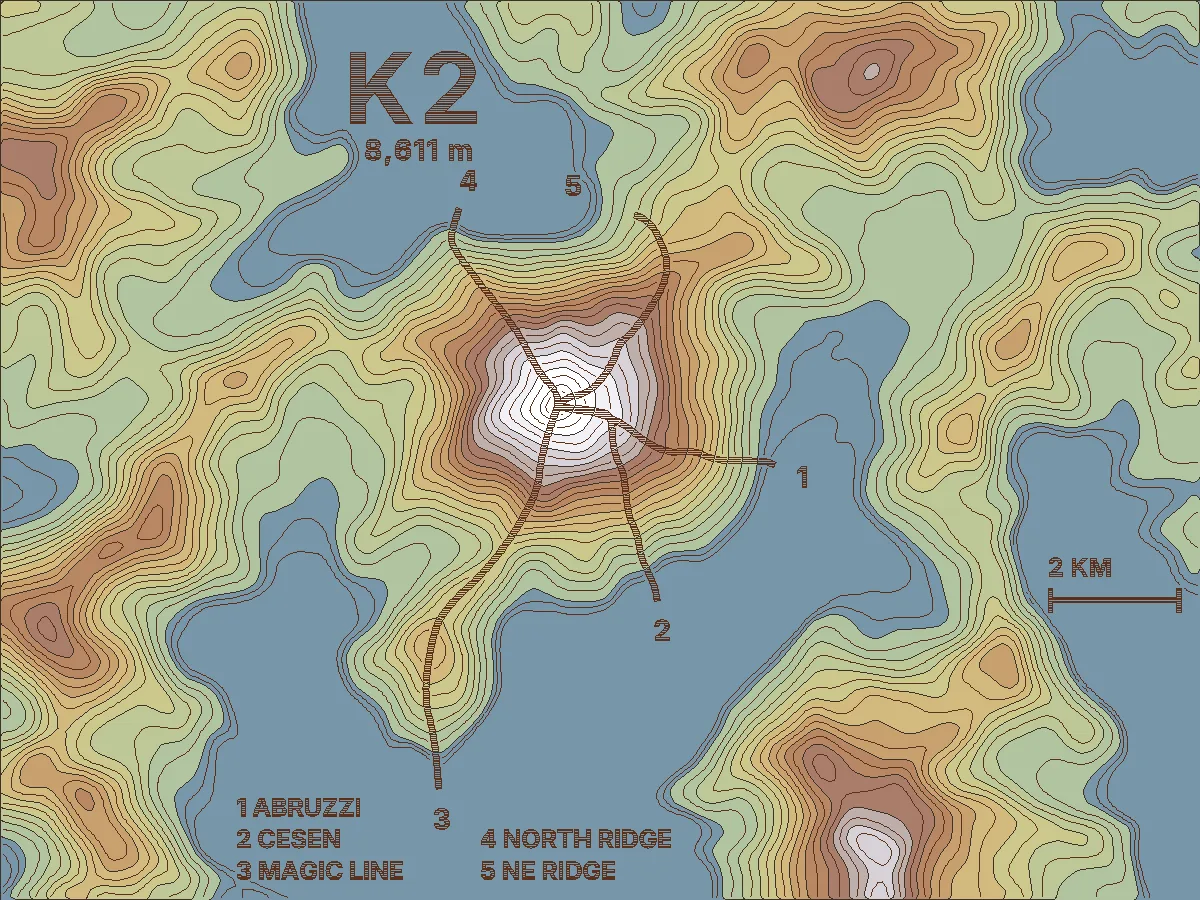
Read the preview. You want:
- 12 relief layers, with no note about layers being left out at the top;
- the lettering entirely on the flat base colour, with nothing crossing a step;
- a green No parts overlap in 3D, which is the generator's collision check;
- no warning about the markings being stretched or text being left out.
If the summit is missing a layer or two, lower Smallest feature (the note says how many were left out). If the lettering is chopped, raise Sea level so that more of the ground is flat, or move the text.
Step 5: Cut, paint, assemble
- Download the SVG or DXF sheets: the cut is red and the engraving blue. For K2 that is 13 parts on two 600 × 400 mm sheets. Run the engraving first, then the cuts.
- Paint or stain the layers before you glue if you want the contour-map colours: it is far easier on loose sheets than on a finished stack. Keep the paint off the faces that get glued.
- Cut the pins the notes give you (here 33 mm and 24 mm) from a 3 mm skewer and push them into the base.
- Glue the sheets in label order, B1 then L1 upwards, each onto the outline engraved on the one below. The pins line up the lower sheets, and the first sheet with no hole covers them. Press the stack under a weight while the glue sets.
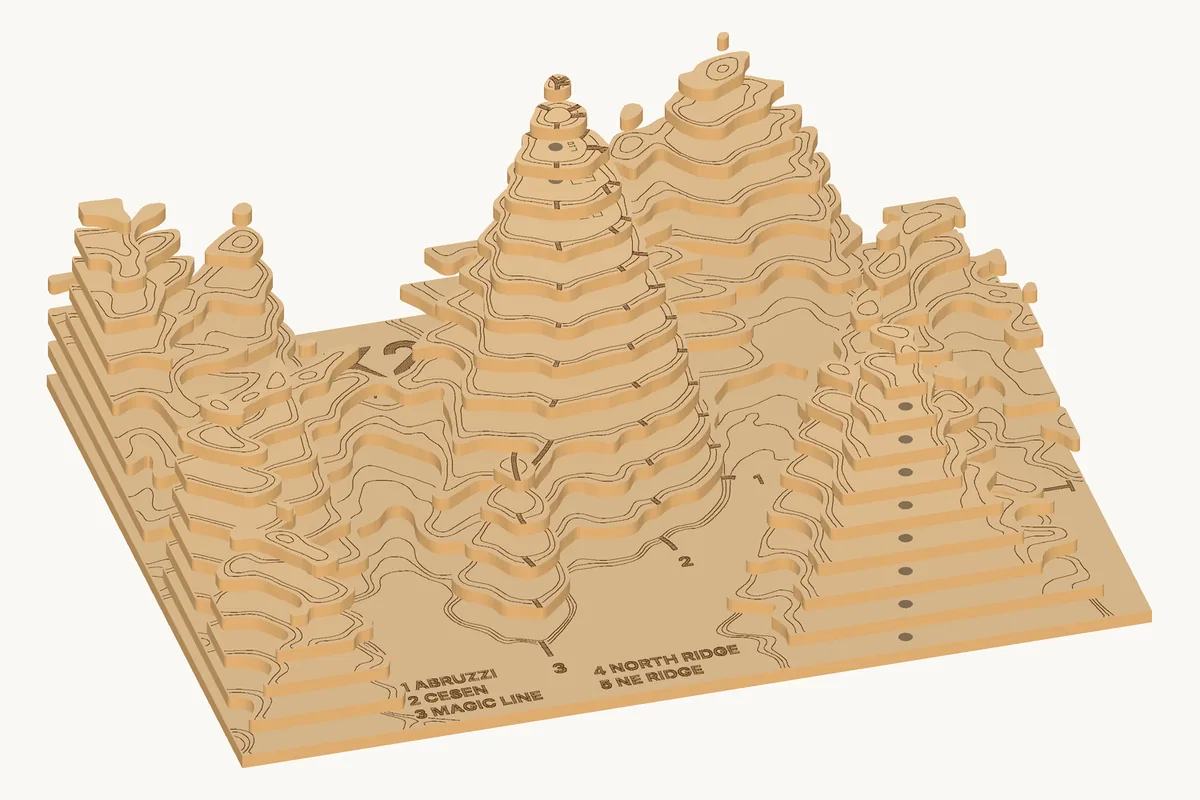
Tips
- Another mountain? Change
LAT,LONand the size in both scripts and run them again. The map has to fit inside one 1° tile of the elevation model. Over a tile edge, merge the neighbouring tiles first. - A taller mountain. Raise Relief height (one step per sheet). Real mountains look flat at true scale, so most maps exaggerate by two or three times; K2 is steep enough to look right at 1.06.
- Thicker or thinner plywood. The number of layers follows the thickness: 36 mm of relief is 12 sheets of 3 mm or 18 sheets of 2 mm, with a smoother mountain.
- Your own routes. Replace the waypoints with your own, or with a track you are allowed to use, as latitude and
longitude. A route number that would land on a slope can be moved onto flat ground with the
NUDGEtable in the script.
Open the Relief map generator · All generators
Data credit and sources
Elevation: produced using Copernicus WorldDEM-30 © DLR e.V. 2010-2014 and © Airbus Defence and Space GmbH 2014-2018 provided under COPERNICUS by the European Union and ESA; all rights reserved. The organisations in charge of the Copernicus programme by law or by delegation do not incur any liability for any use of the Copernicus WorldDEM-30. The heightmap, its pictures and the maps in this post are adapted from that data. laserpuzzle is not endorsed by the European Commission, ESA, DLR or Airbus.
The data is free to use under the
Copernicus DEM licence,
which lets you reproduce, distribute and adapt it, including a map like this one, as long as you pass on the notice
above and bind anyone you pass the data to. k2-heightmap.png comes with
NOTICE.txt for exactly that. It is listed on the
AWS Open Data registry.
Route history: 1954 Italian expedition to K2 and Lino Lacedelli; K2's Magic Line (American Alpine Club) and the 1986 K2 disaster; Tadeusz Piotrowski; Tomo Česen and Second Seven Summits: K2 for the Česen route; K2: the North Ridge and Is K2 becoming less savage? for the north side and 1978; the first winter ascent.